Changing cPanel AutoSSL notifications.

To change cPanel AutoSSL notifications, follow these steps:

  1. Log in to your cPanel account.

  2. If you're unsure how to log in, refer to this article for guidance.

  3. Open the Contact Information tool:

    • If you're using the Jupiter theme, go to the Tools page, find the Preferences section, and click on the Contact Information icon. That is :
    • contact information
    • If you're using the Paper Lantern theme, go to the cPanel home page, locate the PREFERENCES section, and click on Contact Information. :
    • contact info
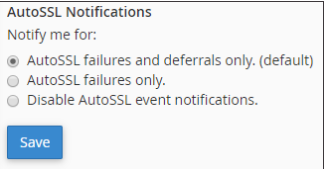
  4. Scroll down on the Contact Information page until you see the AutoSSL Notifications section.

  5. Choose the notification option that suits your preferences. :

  6. AutoSSL option
  7. Click on the Save button to save your changes.

By following these steps, you can easily change the cPanel AutoSSL notifications to receive the desired notifications for your account.

Was this answer helpful?

Related Articles

550 Sender verify failed error message

The "550 Sender verify failed" error message typically occurs when the sender's email...

Accessing cPanel

There are three ways you can access your cPanel account and either way will work. You can search...

Accessing phpMyAdmin and phpPgAdmin

To access phpMyAdmin and phpPgAdmin in cPanel, follow these steps: Log in to your cPanel...

Accessing the Managed Team feature in cPanel

To access the Manage Team feature on TurnupHosting, follow these steps: Log in to cPanel by...

Accessing webmail clients directly

To provide users with direct access to a specific webmail client when they log in, you can...